

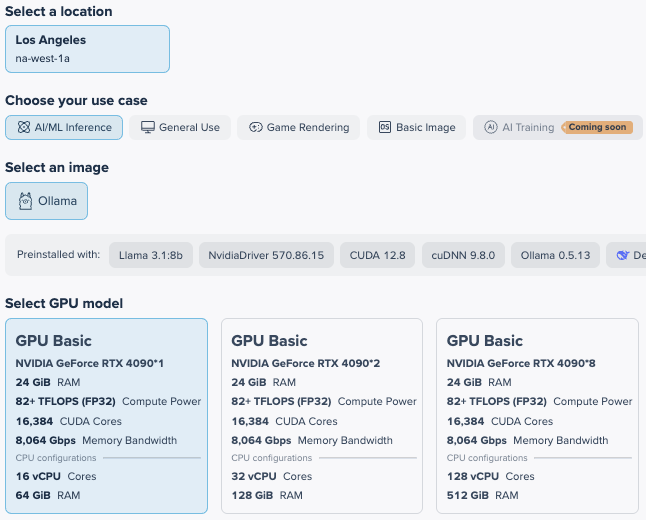
For this guide, we will focus on the Nvidia RTX 4090, as its capabilities align very well with Llama’s 8-billion parameter model. We will explore deploying Llama 8B on a single RTX 4090 in one region and then extend inference to another region where we will deploy a CPU-based virtual machine also running Llama to showcase hybrid flexibility. We will use HAProxy to distribute requests across both instances, then conclude with enabling the entire deployment as an API endpoint with Flask.
With pre-installed tools like Ollama, JupyterLab, cuDNN, and CUDA, these VMs in Zenlayer’s GPU Cloud provide an accessible platform for teams of all skill levels and can support a wide range of inference requirements.
What is distributed inference?
Distributed inference means executing a large language model (LLM) like Llama across multiple machines and geographic regions to handle scalable AI tasks like chatbots, text generation, or as an API for enterprise applications. For this demo, we will be deploying VMs in two different regions to better serve a distributed set of end users.
Llama 8B customization
Llama 8B’s 32-bit floating point (FP32) format available as a preinstalled model on Zenlayer’s GPU Cloud requires about 40 GiB of vRAM exceeding the single RTX 4090s 24 GiB capacity. Therefore, we’ll optimize Llama to FP16 which needs about 20 GiB for the GPU and explore how a CPU based VM in another region can assist with lighter inference loads leveraging Zenlayer’s global infrastructure for low latency delivery.
Our GPU Cloud comes ready with:
- Ollama: A light LLM framework preinstalled for LlaMA 8B deployment
- JupyterLab: A tool for scripting and testing, ideal for managing a multi-region deployment
- cuDNN: Library that helps accelerate NVIDIA GPU operations
- CUDA: Model to accelerate matrix operations by executing thousands of threads simultaneously.
These preinstalled components simplify deployment across GPU and CPU VMs. Let’s start with the single RTX 4090 and later expand the deployment to a CPU-based VM in Singapore.
Deploying Llama 8B on a single RTX 4090 VM
We will provision a single RTX 4090 VM in Zenlayer’s na-west-1a region which is in Los Angeles, California
 From zenConsole: console.zenlayer.com
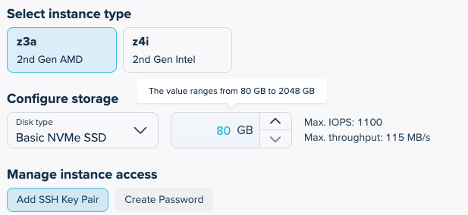
We have a few other options available in zenConsole when deploying, including selecting an instance type of either a 2nd Gen AMD CPU or a 2nd Gen Intel CPU. The CPU’s role is lightweight and secondary to the GPU but can still have an impact on preprocessing, data loading, and overall efficiency.
Here, we will opt for the AMD CPU which provides excellent single-threaded performance, but if your pipeline heavily parallelizes preprocessing across threads, then the Intel instance type might make sense.
We will select the 2nd Gen AMD and add our SSH key for access.
For networking and security, zenConsole provides the flexibility to establish a global VPC and define a security group. A global VPC allows you to create isolated networks and manage IP addressing while providing secure connections between instances in multiple regions. In our case, we will accept the defaults but you can learn more about the networking and security options in our elastic compute overview.
After clicking Confirm Order, you can grab the public IP address and SSH into the virtual machine.
Deploying the Llama model
Our first step will be to run JupyterLab. JupyterLab is a web-based platform that allows us to organize our code and data in Jupyter notebooks, making it ideal for data analysis and customizing workflows.
Once you have established an ssh session with the VM you deployed, use this command on the command line to enable JupyterLab:
jupyter lab –ip=0.0.0.0 –no-browser
Now you can access jupyter lab in your browser at this address:
<vm-public-ip>:8888/lab?token=<token>
The token details will be provided when running the command to enable JupyterLab and use the public IP of your vm to replace the placeholder in the brackets above. You can find the public IP of your VM in the zenConsole.
Now we will use JupyterLab to optimize to FP16 since LlaMA 8B’s FP32 size needs trimming in order to run efficiently on the 24 GiB of RAM available.
Create an Ollama Modelfile in JupyterLab by creating a python3 notebook, paste the code below into the notebook and then hit play.
with open("Modelfile", "w") as f:
f.write("FROM llama3.1:8b")
Now we can build the FP16 Model. We will use Ollama which is a user-friendly platform for developers to deploy and customize AI models. The modelfile is a configuration file that will be used by Ollama to customize the language model.
In a new JupyterLab notebook cell type the following:
!ollama create llama-8b-fp16 -f Modelfile
This creates a new model named llama-8b-fp16 based on llama3.1:8b. Ollama will use the base model’s weights and apply default optimizations to fit GPU memory.
Now we run the model. Open a Bash shell session on the VM using Jupyterlab and type the following in the prompt:
source ~/jupyter_env/bin/activate
Your prompt should now be prepended with (jupyter_env) indicating the virtualenv is now active.
Now lets run Ollama in the background. In the terminal type:
ollama run llama-8b-fp16 &
You will see a process ID (example, [1] 1234) and the prompt will return. You can now verify Ollama is running by typing the following in the prompt:
ollama ps
And you can check the GPU usage by typing the following in the prompt:
nvidia-smi
In my case, I received the following output:

Now we can test inference in a JupyterLab Notebook. Switch back to your JupyterLab notebook and in a new cell run this test:
import requests
payload = {"model": "llama-8b-fp16", "prompt": "Tell me on thing about GPUs"}
response = requests.post("http://localhost:11434/api/generate", json=payload)
print(response.json())
You should see responses that look like this:

This means the model is working! And in our case, if we concatenate all of the “response” fields from the JSON the model produced, we get the following response:
“One key aspect of GPUs (Graphics Processing Units) is that they are designed to handle massive parallel processing, which allows them to perform many calculations simultaneously. This contrasts with the more sequential approach used by CPUs (Central Processing Units), making GPUs particularly well-suited for tasks such as 3D graphics rendering, scientific simulations, and deep learning operations.”
You can add the following python to your notebook to parse the responses and get a cleaner output:
import requests
payload = {"model": "llama-8b-fp16", "prompt": "Test inference on CPU", "stream": True}
response = requests.post("http://localhost:11434/api/generate", json=payload, stream=True)
# Iterate over the streamed lines
for line in response.iter_lines():
if line: # Skip empty lines
json_data = line.decode('utf-8')
data = requests.compat.json.loads(json_data)
if "response" in data:
print(data["response"], end="") # Print each piece of the response
if data.get("done", False):
print("\nDone!")
break
Great! Our model is up and running!
Distributed inference across regions: Adding a CPU VM
Now, let’s distribute inference globally. For this demo, we will use HAProxy to distribute requests among virtual machines in multiple regions. HAProxy is an open-source load balancer that distributes incoming requests across multiple servers. We can use this setup to distribute requests among multiple virtual machines in a single region or in multiple regions.
In a future series, we could also explore Zenlayer’s CDN as a way to distribute requests across multiple regions and provide a bit more intelligence with regard to choosing the closest server to the user — but for now, we will stick to a locally deployed HAProxy to demonstrate the use case.
In zenConsole, provision a CPU-based VM (e.g., 16 vCPUs, 64 GiB RAM) in another region, like Singapore, and we will deploy and customize our llama model similar to what we did on the GPU VM:
CPU VM Setup: SSH into the CPU VM and install Ollama 6B (if not preinstalled). Once you have established an ssh session type the following in the command prompt:
ollama pull llama3:8b
Now we can use a JupyterLab notebook cell to create a simple Modelfile using LLaMa 8b as the base. Type the following in a JupyterLab notebook and hit play:
with open("Modelfile", "w") as f:
f.write("FROM llama3.1:8b")
Now that the modelfile has been written we can build the FP16 model. Type the following in a new JupyterLab notebook cell:
!ollama create llama-8b-fp16 -f Modelfile
and now we can run the model:
!ollama run llama-8b-fp16 &
Route requests: In JupyterLab on the GPU VM, we will now set up HAProxy to distribute inference requests.
Create a haproxy.cfg with nano and place the following in the haproxy.cfg file. You will need to insert the IP addresses for your virtual machines in the snippet below and confirm that ollama is listening on those ports.
frontend ollama_front
bind *:11435
default_backend ollama_back
timeout client 30s
timeout connect 30s
timeout server 30s

backend ollama_back
server gpu1 <ip>:11434 check
server cpu1 <ip>:11434 check
timeout client 30s
timeout connect 30s
timeout server 30s
Let’s confirm that HAProxy is installed on the GPU VM. Type the following commands in the console prompt:
sudo apt update
sudo apt install haproxy
and verify installation:
haproxy -v
And now we can start the HAProxy with our config file:
haproxy -f haproxy.cfg
Now that HAProxy is running we can verify on the GPU VM by running from command line:
curl http://localhost:11435/api/generate -d ‘{“model”: “llama-8b-fp16”, “prompt”: “Test”}’
And from a new notebook cell in JupyterLab using the snippet below we can route requests to our HAProxy (replace IP):
import requests
import json
payload = {"model": "llama-8b-fp16", "prompt": "Global test"}

response = requests.post("http://<ip>:11435/api/generate", json=payload, stream=True)
for line in response.iter_lines():
if line:
print(json.loads(line.decode('utf-8')))
Without the parsing of JSON we should receive output that looks like this

You can use the additional code mentioned earlier in the article to parse the JSON and provide a more readable output, but this raw output confirms that the model is successfully responding. You can now use the logs from HAProxy to see how multiple requests are getting spread across our virtual machines.
If you want to send a request to your new inference infrastructure from your office or home, you can use this curl command. Just add the IP address where HAProxy is configured, and feel free to change the prompt!
curl -X POST http://<ip>:11435/api/generate -d ‘{“model”: “llama-8b-fp16”, “prompt”: “Generate a short story about a robot”}’
Let’s now enable an API endpoint for this model.
We will use Flask, a lightweight web framework, to allow us to create an API endpoint that can be used to accept client requests from an application, forward them to HAProxy, and return the response. We will skip some of the standard security you might put in place just for ease of deployment at the moment.
Let’s first deploy flask.
Access the server you deployed HAProxy on via ssh and run the following in the command prompt:
pip install flask
Now let’s create the python file to create the API endpoint. Run:
nano ~/haproxy_api.py
Use this script in the haproxy_api.py file (replace IP address with the IP of server running flask:
from flask import Flask, request, Response
import requests
import json

app = Flask(__name__)

# HAProxy endpoint
HAPROXY_URL = "http://<ip>:11435/api/generate"

@app.route('/api/inference', methods=['POST'])
def inference():
    # Get JSON payload from client
    data = request.get_json()
    if not data or 'prompt' not in data:
        return Response(json.dumps({"error": "Missing 'prompt' in request"}), status=400, mimetype='application/json')

    # Set default model if not provided
    payload = {
        "model": data.get("model", "llama-8b-fp16"),
        "prompt": data["prompt"]
    }

    # Forward request to HAProxy
    try:
        response = requests.post(HAPROXY_URL, json=payload, stream=True)
        response.raise_for_status()

        # Stream response back to client
        def generate():
            for line in response.iter_lines():
                if line:
                    yield line + b'\n'  # Add newline for streaming
        return Response(generate(), mimetype='application/json')

    except requests.RequestException as e:
        return Response(json.dumps({"error": str(e)}), status=500, mimetype='application/json')

if __name__ == '__main__':
    app.run(host='0.0.0.0', port=5000, debug=True)
Now run the python script. Type:
python ~/haproxy_api.py
Now flask should be running, and you can use the API by doing a post to the API endpoint from your application. Make sure to customize with your IP:
curl -X POST http://<ip>:5000/api/inference -H “Content-Type: application/json” -d ‘{“prompt”: “Generate a short story about a robot”}’
We now have a distributed inference model deployed on Zenlayer and available via API!
Key takeaways
- Single RTX 4090: FP16 optimization fits Llama 8B within 24 GiB vRAM, delivering efficient inference in one region.
- Multi-Region Distribution: Pairing a GPU VM with a CPU VM across regions leverages Zenlayer’s global reach, balancing performance and cost.
- Preinstalled Tools: Ollama and JupyterLab streamline deployment and makes configuration straightforward